This post will teach you how to find all pages on a website in 5 easy steps using one of the best tools around, Screaming Frog. And I’ll be using easy-to-follow GIFs and screenshots to make sure you really learn how to use the tool.
We’re going to be focusing on finding all linked pages on a website. Linked pages are pages that are discoverable from a website. A person or web crawler can discover pages by clicking links on a website, or crawling links in the case of a web crawler.
To clarify, “crawling” is when a crawler visits a web page and discovers other pages by following links across a website. Screaming Frog is a crawler tool.
Let’s get this show on the road.
Jump to a section
Step 1: Download Screaming Frog
You can download Screaming Frog here.
Just a quick note, while you can download a free version of Screaming Frog, I strongly recommend investing in the paid version. You won’t be limited to a 500 URL crawl and you’ll have access to a lot more features. It’s the best value crawler tool out there. Disclaimer: Screaming Frog aren’t paying me. Honest!
Step 2: Configure the Screaming Frog spider settings
After you’ve downloaded Screaming Frog and before you hit the start button to run the crawl, we’re going to adjust some of the configuration settings. I’m going to demonstrate the setup of a crawl in the GIF below.
Bear in mind the setup is for the paid version of Screaming Frog. If you’re using the free version, you won’t be able to change the configuration settings. Instead, you should paste the homepage URL in the toolbar and click “Start” in the Screaming Frog interface; however, you’ll only be able to crawl up to 500 URLs as I mentioned earlier.
Screaming Frog set up:
- Configuration → Spider
- Untick “Images”, “CSS”, “JavaScript” and “SWF”
- Tick “Pagination (Rel Next/Prev)”, “Crawl Outside of Start Folder”, “Follow Internal “nofollow” and “Follow External “nofollow”
The below GIF walks you through each step in the above Screaming Frog set-up.
Above: Configuring Screaming Frog to crawl a website
And the below image is what your Spider configuration will look like after you’ve finished point 3 in the set-up.
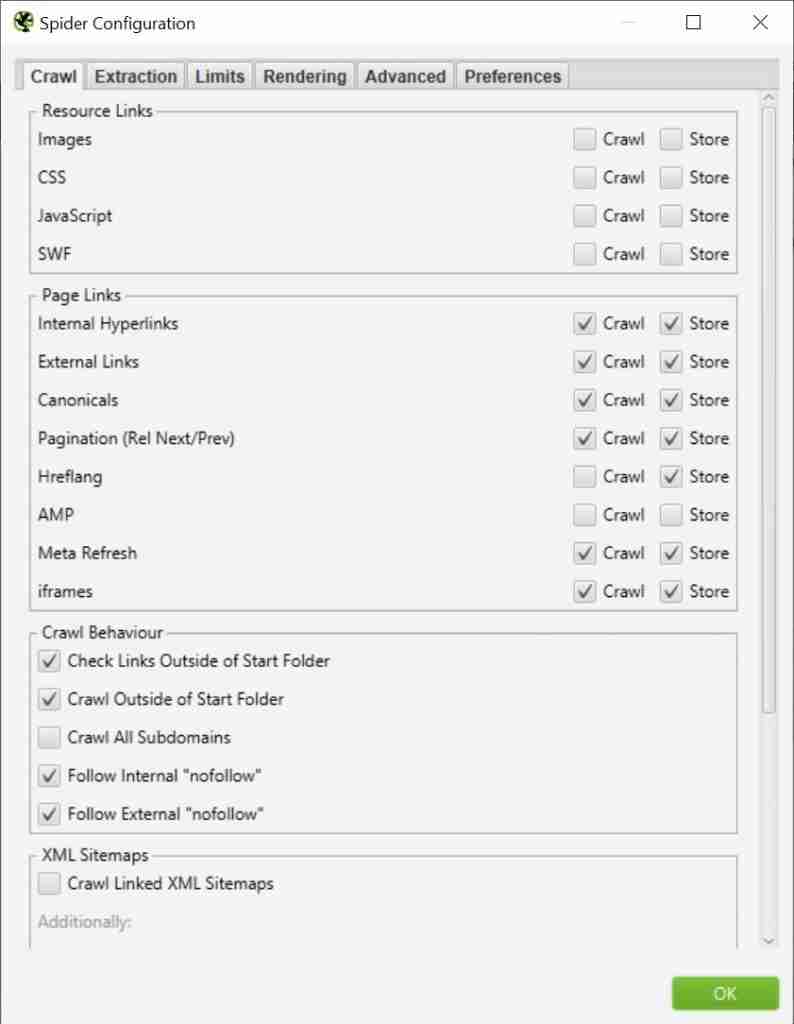
Above: Screaming Frog’s Spider Configuration
If you’re interested, you can learn more about every one of the configuration options, but I’m just going to focus on the ones I unticked and ticked.
Unticked configurations:
- Images, CSS, JavaScript and SWF: I’ve bundled these options together because I unticked them for the same reason. CSS, JavaScript and images are more about the look and functionality of a site, rather than actual pages we’re trying to find. Unticking these options will also make your crawl much faster.
Something to note, if you suspect a website is heavily built on JavaScript, then you’ll likely need to crawl the site with JavaScript enabled to find links.
Ticked configurations:
- Pagination (Rel Next/Prev): This instructs Screaming Frog to crawl paginated pages that are discovered by Rel Next/Prev tags. If you don’t care about paginated pages then untick the boxes.
- Crawl Outside of Start Folder: This ensures pages that live outside the start folder are crawled. For instance, if a crawl starts at example.com/services/, then URLs that include a different subfolder, such as example.com/blog/, will be crawled. If you began to crawl from the homepage then this shouldn’t matter, but it’s good practice to keep this box ticked.
- Follow Internal & External “nofollow”: This instructs Screaming Frog to crawl links that use the “nofollow” attribute. FYI… external links are links that point to a different domain. Feel free to untick the external link boxes if you don’t care about them.
Step 3: Run the crawl
This is the easy part. After you’ve configured Screaming Frog hit the “Start” button to run the crawl.
Above: Starting the Screaming Frog crawl
You’ll be able to get an idea about the progress of the crawl by looking at the percentage bar in the interface.
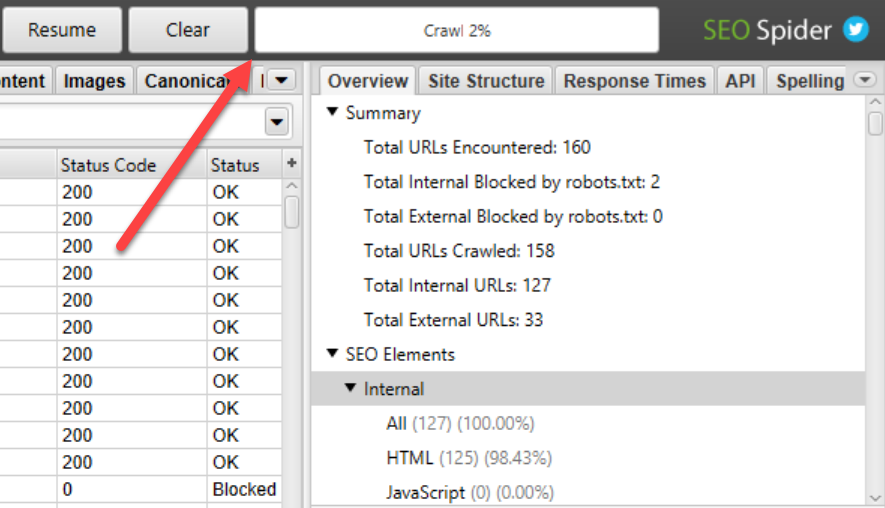
Above: Screaming Frog crawl progress bar
Additionally, you can get more specific information on a crawl, such as the actual number of URLs crawled, in the bottom right-hand corner.
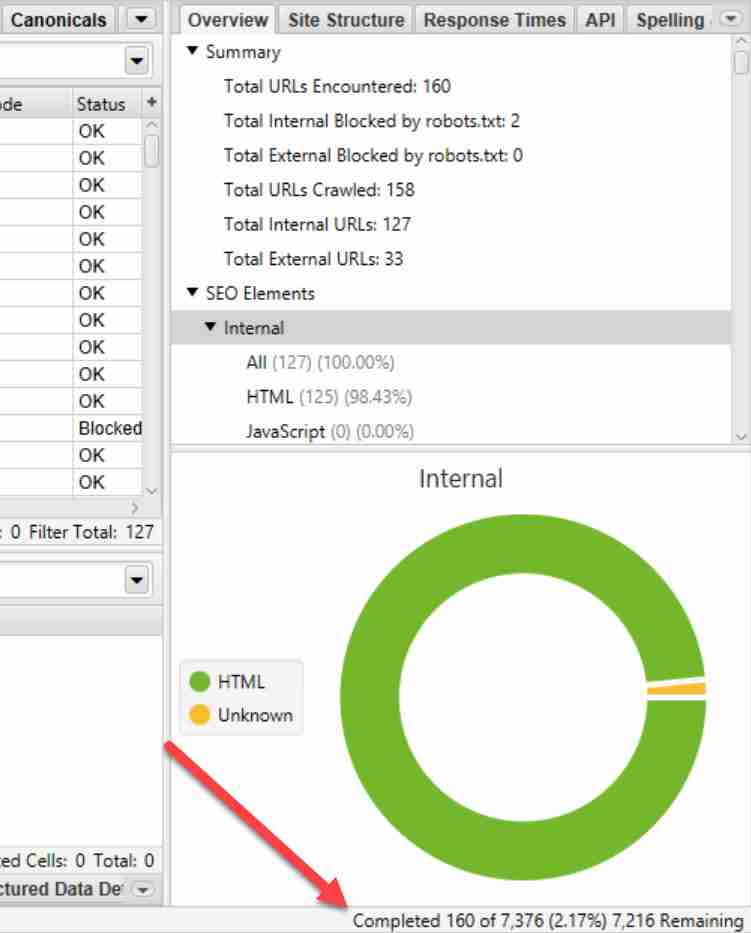
Above: Screaming Frog URL crawl progress
However, the progress information is just an estimation. The estimated number of URLs it needs to crawl will change as the Screaming Frog crawler discovers more of a website.
If you have a large site, I’d suggest grabbing a coffee and working on something else. It could take a while for the crawl to finish.
Step 4: Export the report from Screaming Frog
Once the crawl finishes, it’s time to export the report that will allow you to see all the pages discoverable on your website.
I’ve prepared a crawl for the chocolate chain, Hotel Chocolate. Because who doesn’t love chocolate, right?
Export the Screaming Frog report:
- Click “Export”
- Save the file

Above: Exporting the Screaming Frog crawl
Step 5: Look through your export
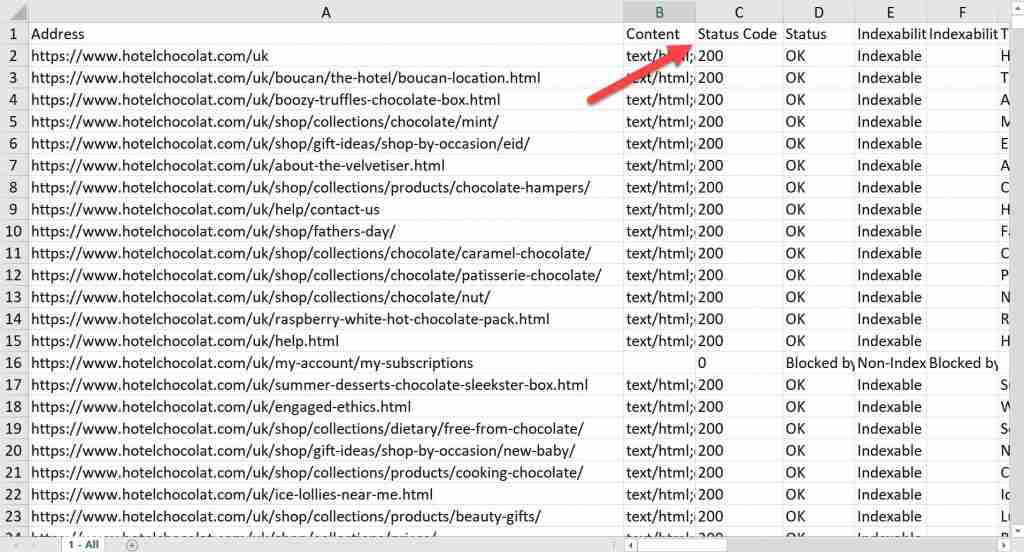
We’ve made it to the finish line! Once you’ve opened your export, you’re going to see lots of columns. To find all pages on your website, you need to focus on the column labelled “Address”.

Above: The “Address” column lists all discovered pages on a website
Bonus step: look at the status code of each page
Once you have your list of pages, you might want to add a filter to the status code column. It’s the third column in your export.
Above: The “Status Code” column in the Screaming Frog export
The status code column will tell you the “status” of a page. For example, a 200 response code means that the page is live and accessible. On the other hand, a 404 status code means the page no longer exists and a 301 status code means a page has been redirected elsewhere.

Above: URLs that return a 404 status code
You’ll want to make sure pages discoverable on your website only return a 200 status code. Otherwise, it could lead to a bad user experience.
But there’s good news! You can use the very same crawl you’ve just run to find where these pesky 404 pages are found on a website. Check out the Screaming Frog section in this guide to find 404 errors.
Summary
In the end, you learned how to use Screaming Frog to find all pages on a website. However, the Screaming Frog crawl and export really is a treasure trove of useful information that goes beyond just finding pages. I’m going to be writing more Screaming Frog related content in the near future, so be sure to keep an eye out.
If you have questions about this blog, feel free to post a comment below.